https://spring.io/guides/topicals/spring-security-architecture
Spring Security Architecture
this topical is designed to be read and comprehended in under an hour, it provides broad coverage of a topic that is possibly nuanced or requires deeper understanding than you would get from a getting started guide
spring.io
위 공식사이트와 블로그의 글들을 참고하여 코드를 재작성해보고 커스터마이징하여 어떤 원리로 돌아가는지 구체적으로 분석해본 글입니다.
목표는 전체적인 아키텍처의 이해와 스프링 시큐리티를 사용하여 JWT를 사용하여 로그인 및 회원가입 그리고 권한별 통제하는 법입니다.
전체 코드는 https://github.com/hangeulisbest/memo
GitHub - hangeulisbest/memo
Contribute to hangeulisbest/memo development by creating an account on GitHub.
github.com
1. JWT 을 이용한 인증 과정
세션기반 인증 방식은 사용자가 로그인 되어있는지에 관한 정보를 세션이라는 이름으로 서버에 저장해둡니다. 보통은 메모리에 세션의 정보를 저장해두며 이로 인해 너무 많은 유저의 정보가 저장된다면 메모리에 부담이 된다는 단점을 가지고 있습니다. 이에 반해 JWT를 이용한 인증방식은 토큰이라는 것을 이용하여 유저의 정보를 토큰에 저장해두고 클라이언트에게 전송하며 따로 서버에 저장해두지 않습니다. 서버에 저장해두지 않기 때문에 메모리 부담은 적지만 토큰을 탈취당하면 토큰 만으로는 부정한 요청인지 알 방법이 없습니다. 그래서 토큰의 주기를 짧게 가져가고 다른 토큰 하나 더 생성하여 긴 주기를 가지게 하여 redis에 토큰의 정보를 저장하는 방법을 많이 택하고 있습니다. 완벽한 방법은 없는거 같습니다. 짧게 주기를 가져간 토큰을 Access Token 이라고 하며 만료된 Access Token 을 재발행(reissue)하기도 하고 긴 주기(2주정도)를 가지는 토큰을 Refresh Token 이라고 합니다. SpringSecurity의 클래스들을 적절히 활용해가며 JWT 을 통한 인증방식을 구현해보겠습니다. Refresh Token을 저장할 redis는 편의상 RDBMS로 대체하였습니다.
아래 그림은 JWT인증 과정을 나타낸 그림입니다.
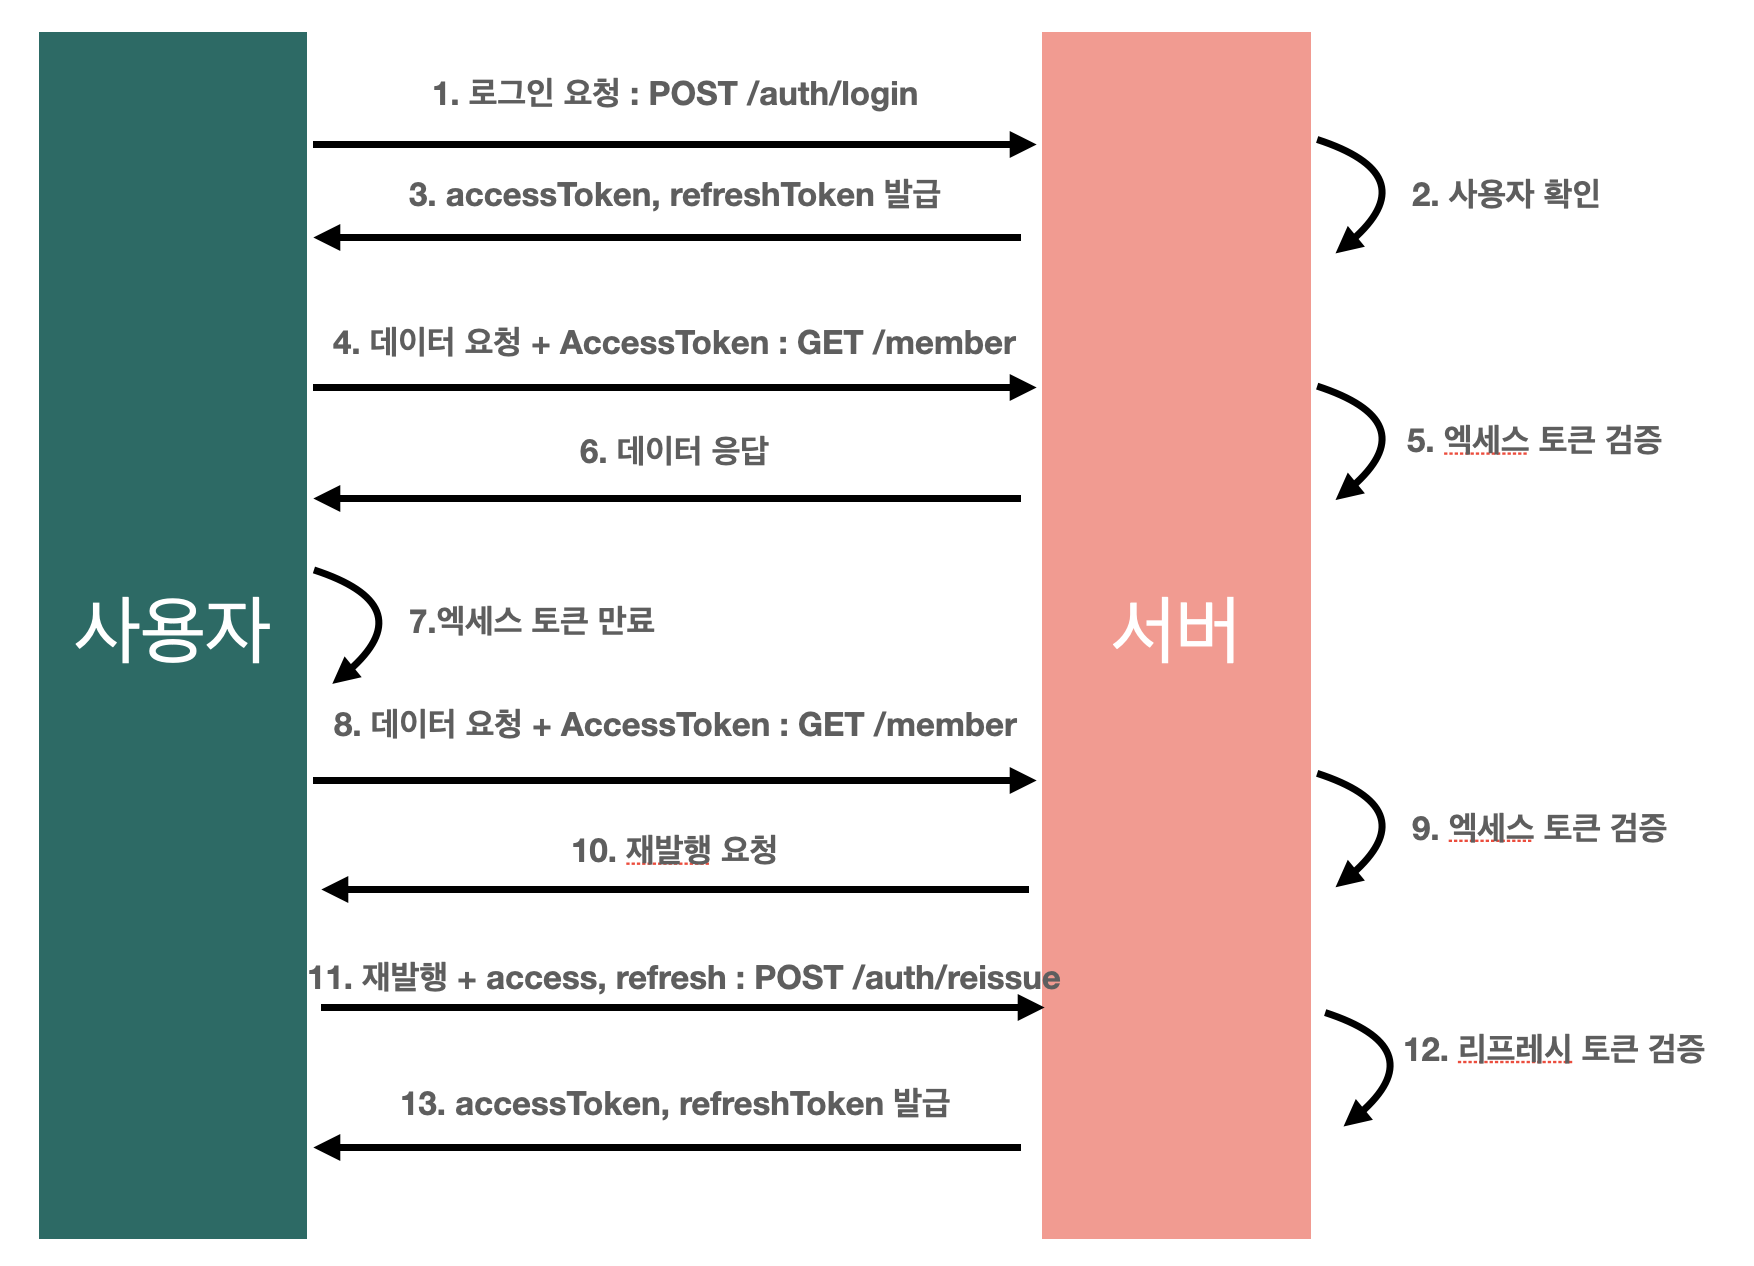
위 그림을 설명해보겠습니다.
- 사용자는 URL /auth/login 로 EMAIL 과 PASSWORD를 POST 요청으로 보냅니다.
- 스프링 시큐리티의 핵심 로직으로 DB로 이메일과 패스워드를 인증하고 통과하면 Access Token과 Refresh Token을 발급합니다.
- 사용자는 일반 데이터 요청을 Access Token과 함께 보냅니다.
- 서버는 Access Token을 검증하고 통과하면 데이터 응답을 보냅니다.
- 사용자가 만료된 Access Token을 이용해 요청을 보내면 서버는 재발행요청을 합니다.
- 재발행 요청은 만료된 Access Token과 유효한 RefreshToken 값을 URL /auth/reissue 로 POST 요청을 보냅니다.
- 서버에서는 RefreshToken을 검증하고 다시 AccessToken과 RefreshToken 값을 사용자에게 넘겨줍니다.
/* 토큰 검증 과정 */


if(엑세스 토큰이 유효함) {
// 요청 처리
}
else if(리프레시 토큰 유효함) {
// 재발행요청
}
else {
// 재로그인 요청
}
2. SpringSecurity 아키 텍처
공식문서(2022-02) 의 내용에서 언급되어 있는 부분을 가져와봤습니다.
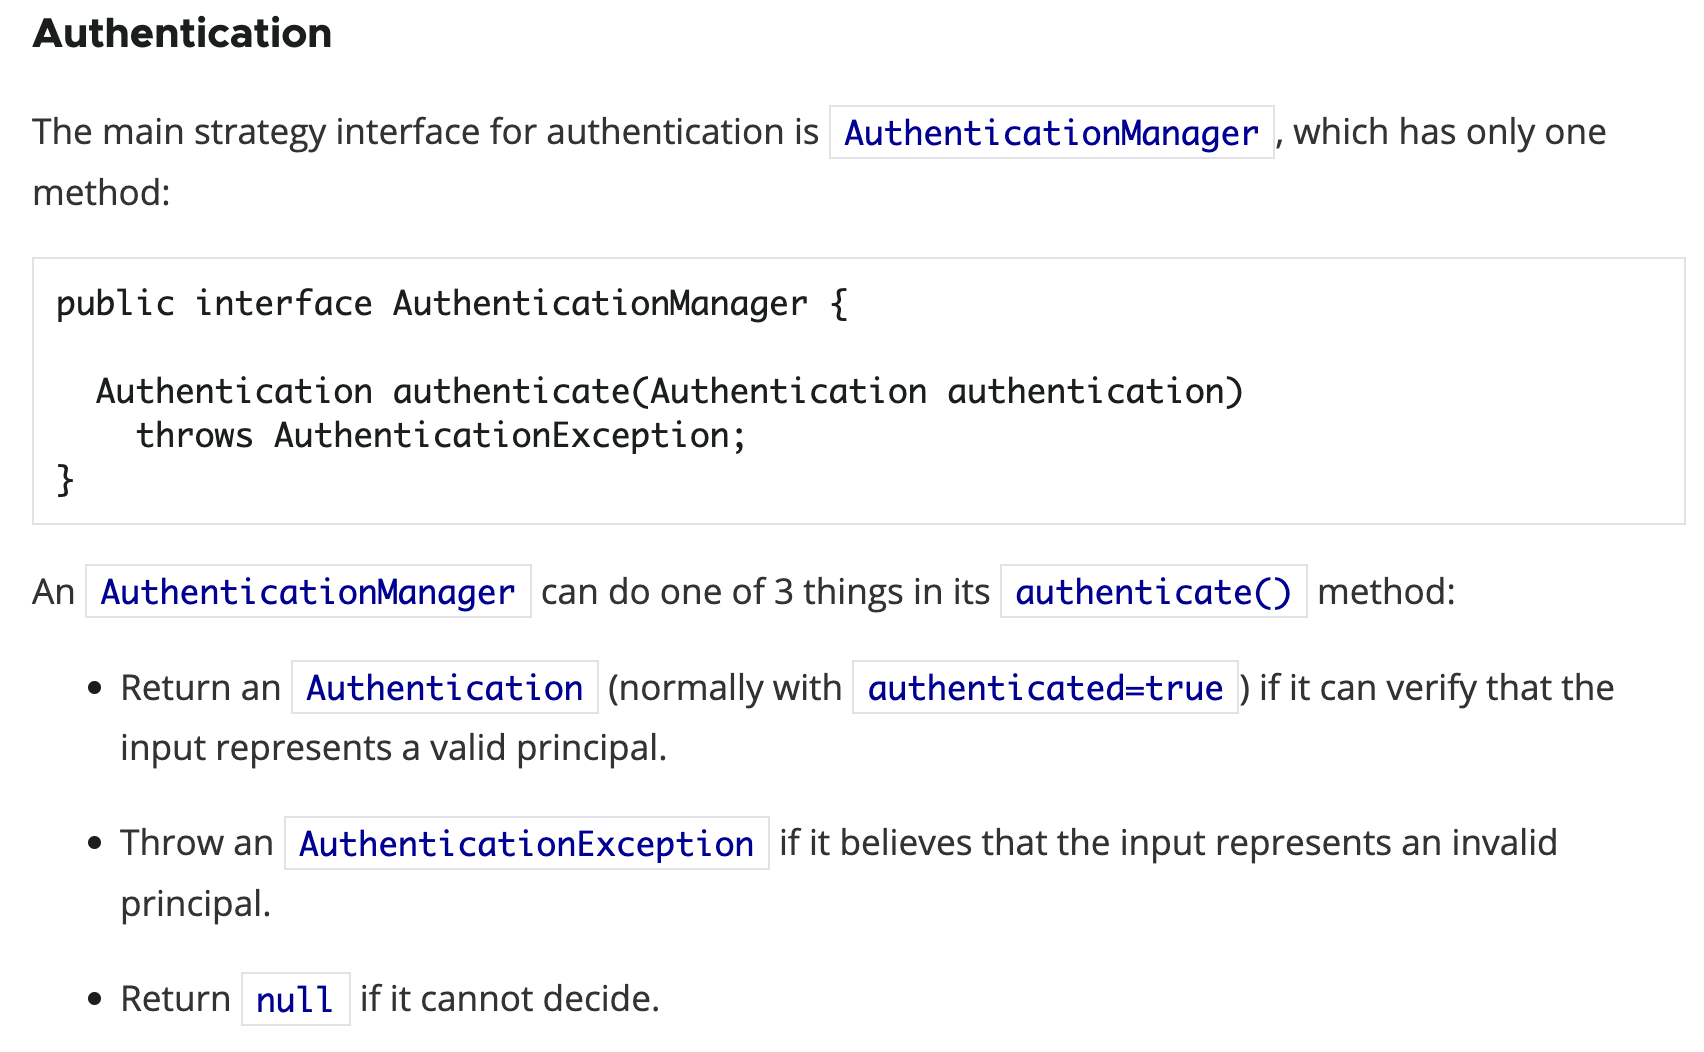
SpringSecurity 에서 인증에 관한 메인 인터페이스는 AuthenticationManager 입니다. AuthenticationManager 에는 authenticate 라는 메소드 1개만 존재합니다. 메서드는 3가지 일을 한다고 하는데 먼저 인증에 통과한다면 authenticated 라는 필드가 true인 Authentication 을 리턴합니다. Authentication의 구현체인 UsernamePasswordAuthenticationToken이 있지만 저는 해당 토큰 또한 커스터마이징 해볼겁니다. 그리고 principal 이 유효하지 않다면 AuthenticationException 을 던진다고 합니다. 이러한 경우에도 해당하지 않는다면 null을 리턴합니다.
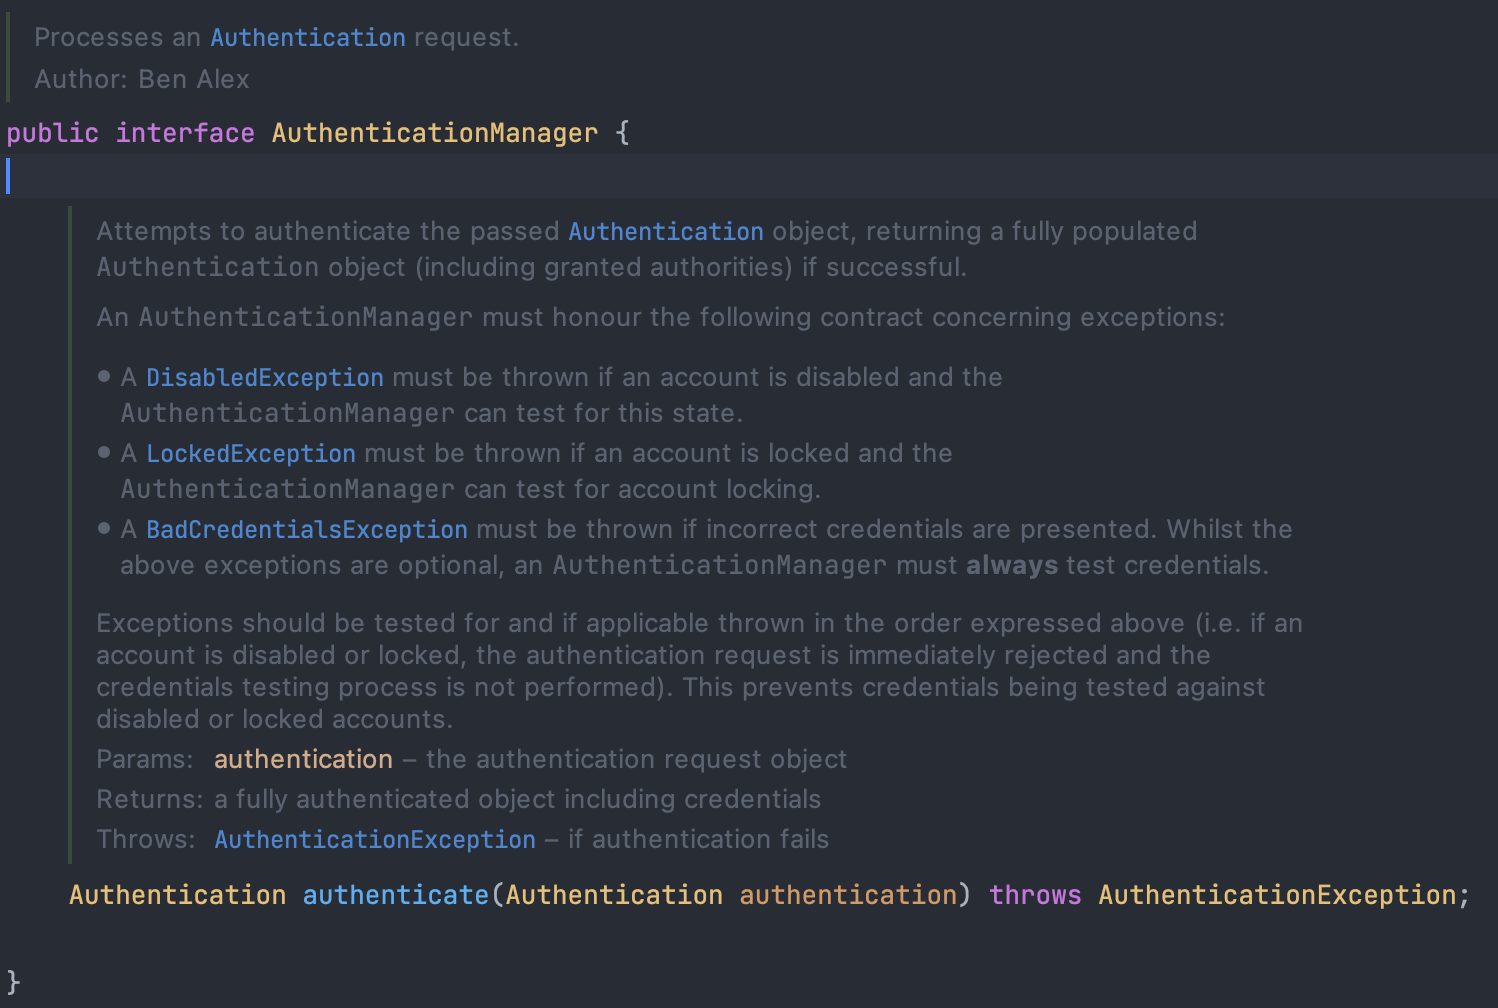
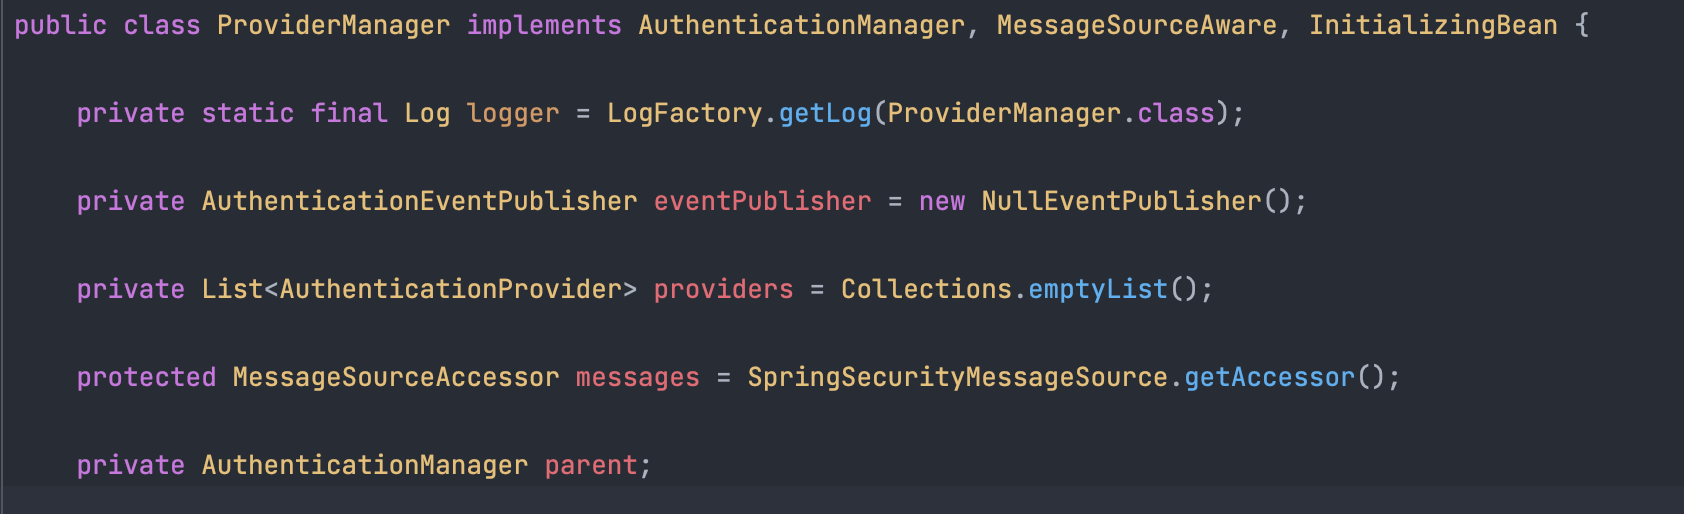
아래는 AuthenticationManager 를 IDE로 좀 더 익숙한 모습으로 가져왔습니다.
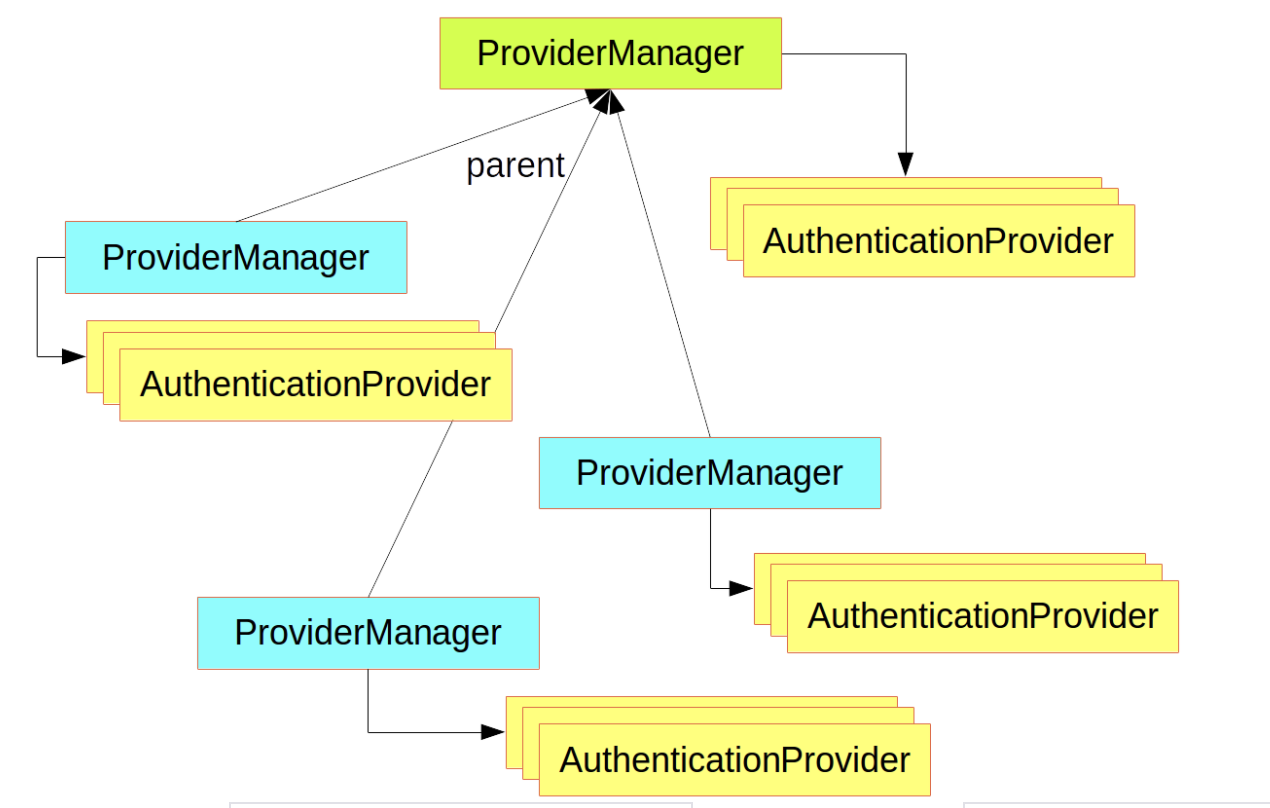
AuthenticationManager 의 구현체가 ProviderManager 입니다. 또한 ProviderManager 는 AuthenticationProvider 의 체인을 가지고 있으며 각각의 AuthenticationProvider 는 어떤 Authentication instance를 support 하는지에 대한 support 함수를 가지고 있고 실제로 authentication instance를 인증하는 authenticate 메서드를 가지고 있습니다.
public interface AuthenticationProvider {

	Authentication authenticate(Authentication authentication)
			throws AuthenticationException;

	boolean supports(Class<?> authentication);
}
ProviderManager를 저렇게 복잡하게 parent 구조를 가질 필요가 있나 싶었지만 스프링시큐리티에서는 다음과 같이 설명합니다.

즉, 리소스들의 논리적인 그룹 패턴은 URL 처럼 생겼다고 하면 각각의 parent를 나타낼 수 있습니다. 예를 들어, /api/a/b/c 의 부모는 /api/a/b 인것처럼 말입니다. 실제로 ProviderManager의 일부를 보면 parent를 가지고 있습니다.
앞으로의 구현에서는 AuthenticationProvider 를 implement 하여 제가 만든 Authentication instance를 support 하는 커스터마이징된 AuthenticationProvider를 이후 구현해보겠습니다.
Spring Security 는 어떻게 보면 하나의 필터이지만 필터체인이라고 하는 것에게 인증을 위임합니다. DelegatingFilterProxy 라고 하는 컨테이너 안에 보통 필터들이 installed 되고 FilterChainProxy 에 위임합니다. 그리고 springSecurityFilterChain 라고 하는 고정된 이름을 사용하는데 실제로 확인해보았습니다.
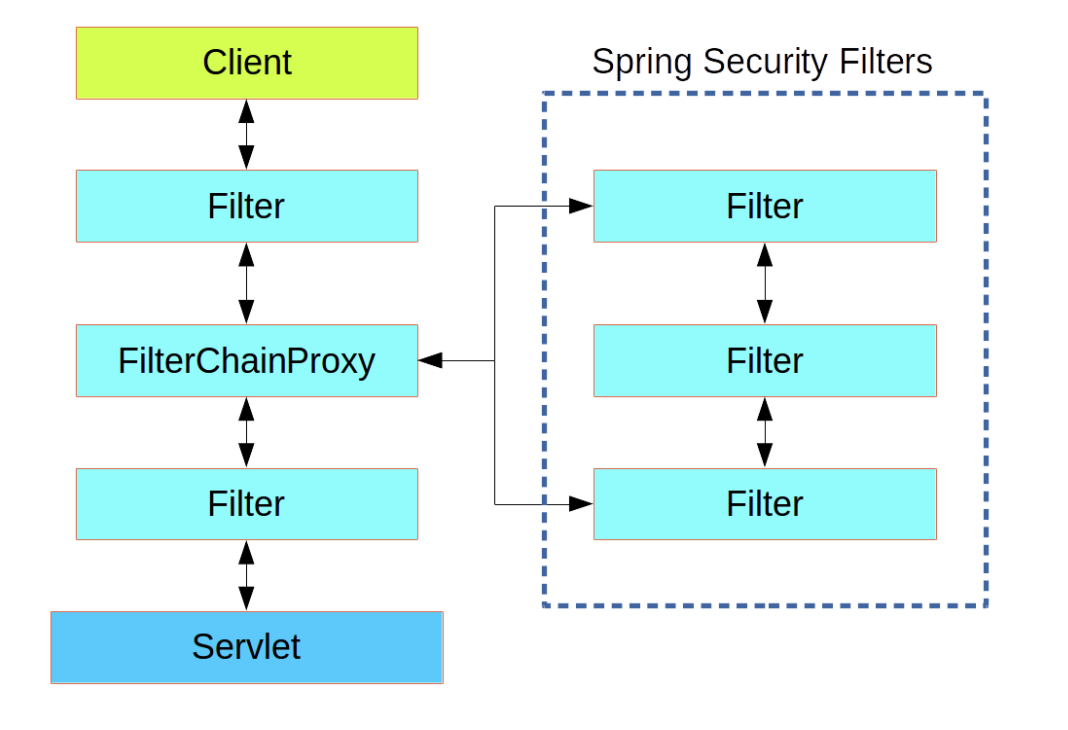
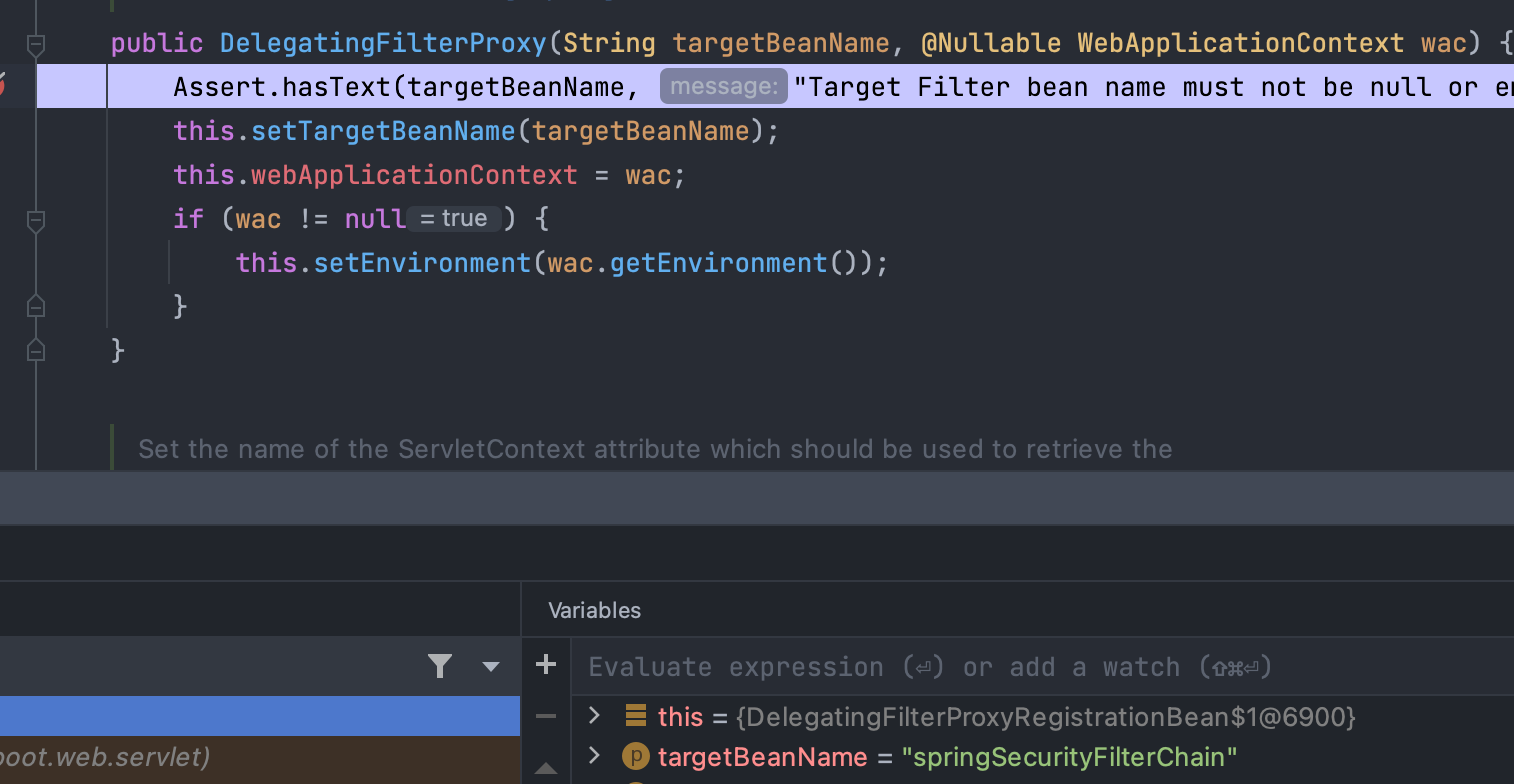
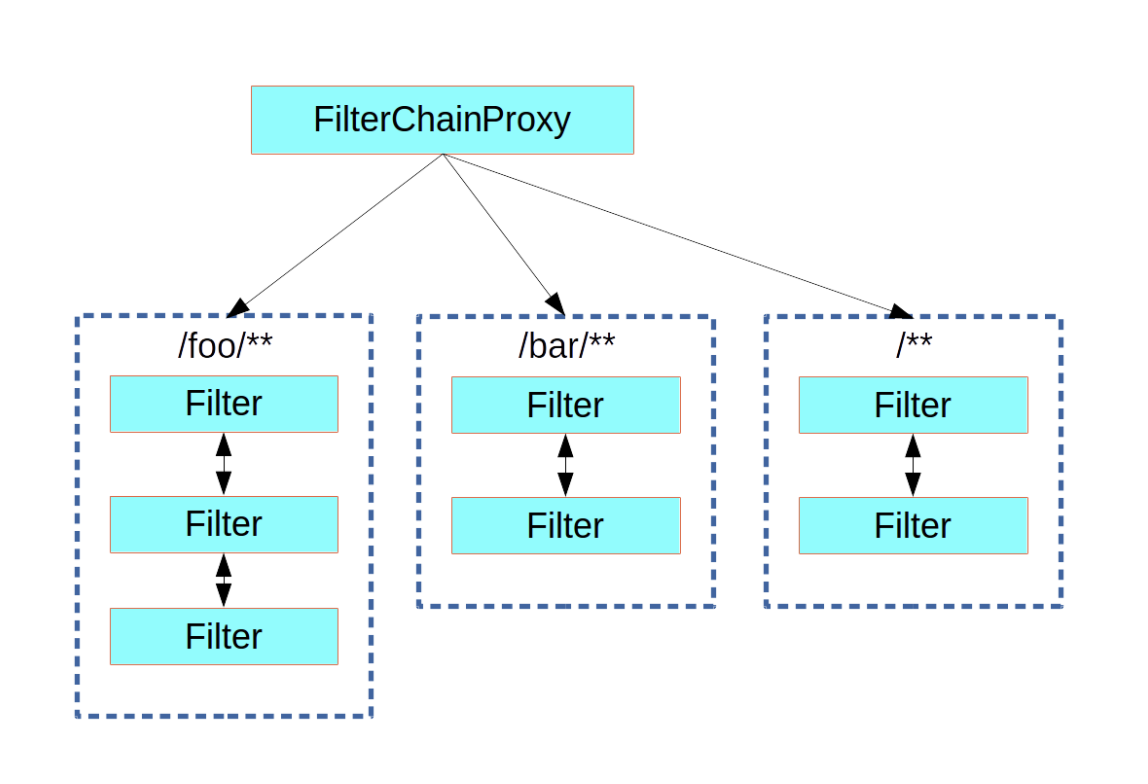
실제 확인 해보면 springSecurityFilterChain 라는 이름을 확인 할 수 있습니다. 그리고 FilterChainProxy는 request path에 따라 다양한 필터들을 가질 수 있습니다. 이는 container인 DelegatingFilterProxy 는 알 길이 없습니다. 아래는 이러한 그림을 나타냈습니다.
대략적인 아키텍처를 파악하였으므로 이제 구체적으로 구현해보면서 좀 더 깊게 분석해보겠습니다.
3. SpringSecurity 를 이용하여 구현
인증에 필요한 멤버 엔티티를 만들어 줍니다. email를 통해 멤버를 찾아야 하므로 unique 속성을 True로 해둡니다. 멤버의 권한들을 Set으로 선언하였으며 이는 @ManyToMany로 매핑하였습니다. 새로운 권한이 생긴다고 하여 Member에 종속적으로 변화가 일어날거 같지는 않아 Member 엔티티 안에서 메소드를 통해 권한을 추가하고 제거하는 로직을 넣었습니다. 이번 주제와는 크게 관련있는 내용이 아니기 때문에 넘어가겠습니다.
Member.java
package com.memo.backend.domain.member;

import com.fasterxml.jackson.annotation.JsonIgnore;
import com.memo.backend.domain.Authority.Authority;
import com.memo.backend.domain.Authority.MemberAuth;
import com.memo.backend.dto.member.MemberUpdateDTO;
import lombok.*;
import org.springframework.security.crypto.password.PasswordEncoder;

import javax.persistence.*;
import java.util.HashSet;
import java.util.Objects;
import java.util.Set;
import java.util.stream.Collectors;


@Getter
@NoArgsConstructor
@AllArgsConstructor
@Table(name = "member")
@Entity
public class Member {

    @JsonIgnore
    @Column(name = "member_id")
    @Id @GeneratedValue(strategy = GenerationType.IDENTITY)
    private Long memberId;

    @Column(name = "username",length = 50,nullable = false)
    private String username;

    // Email 을 토큰의 ID로 관리하기 때문에 unique = True
    @Column(name = "email",unique = true,nullable = false)
    private String email;

    @Column(name = "password",nullable = false)
    private String password;

    @JsonIgnore
    @Column(name = "activated")
    private boolean activated;

    @ManyToMany
    @JoinTable(
            name = "member_authority",
            joinColumns = {@JoinColumn(name="member_id",referencedColumnName = "member_id")},
            inverseJoinColumns = {@JoinColumn(name = "authority_name",referencedColumnName = "authority_name")}
    )
    private Set<Authority> authorities = new HashSet<>();

    @Builder
    public Member(String username, String email, String password, boolean activated,Set<Authority> authorities) {
        this.username = username;
        this.email = email;
        this.password = password;
        this.activated = activated;
        this.authorities = authorities;
    }

    public void addAuthority(Authority authority) {
        this.getAuthorities().add(authority);
    }

    public void removeAuthority(Authority authority) {
        this.getAuthorities().remove(authority);
    }

    public void activate(boolean flag) {
        this.activated = flag;
    }

    public String getAuthoritiesToString() {
        return this.authorities.stream()
                .map(Authority::getAuthorityName)
                .collect(Collectors.joining(","));
    }

    public void updateMember(MemberUpdateDTO dto, PasswordEncoder passwordEncoder) {
        if(dto.getPassword() != null) this.password = passwordEncoder.encode(dto.getPassword());
        if(dto.getUsername() != null) this.username = dto.getUsername();
        if(dto.getAuthorities().size() > 0) {
            this.authorities = dto.getAuthorities().stream()
                    .filter(MemberAuth::containsKey)
                    .map(MemberAuth::get)
                    .map(Authority::new)
                    .collect(Collectors.toSet());
        }
    }
}
멤버들의 권한정보 엔티티를 생성합니다.
Authority.java
package com.memo.backend.domain.Authority;

import lombok.AllArgsConstructor;
import lombok.Builder;
import lombok.Getter;
import lombok.NoArgsConstructor;

import javax.persistence.*;

@Entity
@Table(name = "authority")
@Getter
@Builder
@NoArgsConstructor
@AllArgsConstructor
public class Authority {
    @Id
    @Column(name = "authority_name",length = 50)
    @Enumerated(EnumType.STRING)
    private MemberAuth authorityName;

    public String getAuthorityName() {
        return this.authorityName.toString();
    }
}
MemberAuth는 멤버들의 권한정보를 String으로 관리하기 보다는 enum으로 관리하는게 더 정확하다고 생각했습니다. 또한 String을 이용하여 권한을 찾을 일이 많을 거 같아서 Map처럼 사용할 수 있도록 lookup 맵을 생성하여 조회 및 포함여부를 쉽게 알 수 있도록 하였습니다.
MemberAuth.java
package com.memo.backend.domain.Authority;

import java.util.HashMap;
import java.util.Map;

/**
 * MemberAuth 설명 : 회원들의 권한을 관리.
 * @author jowonjun
 * @version 1.0.0
 * 작성일 : 2022/02/27
**/
public enum MemberAuth {
    ROLE_USER("ROLE_USER"),
    ROLE_ADMIN("ROLE_ADMIN"),

    ;

    private final String abbreviation;

    private static final Map<String,MemberAuth> lookup = new HashMap<>();

    static {
        for(MemberAuth auth : MemberAuth.values()) {
            lookup.put(auth.abbreviation,auth);
        }
    }

    // private
    MemberAuth(String abbreviation) {
        this.abbreviation = abbreviation;
    }

    public String getAbbreviation() {
        return this.abbreviation;
    }

    public static MemberAuth get(String abbreviation) {
        return lookup.get(abbreviation);
    }

    public static boolean containsKey(String abbreviation) {
        return lookup.containsKey(abbreviation);
    }

}
리프레시 토큰을 RDBMS로 관리하기 위해 엔티티를 생성합니다. Redis가 일반적이지만 편의상 RDBMS로 관리합니다.
RefreshToken.java
package com.memo.backend.domain.jwt;

import lombok.Builder;
import lombok.Getter;
import lombok.NoArgsConstructor;

import javax.persistence.Column;
import javax.persistence.Entity;
import javax.persistence.Id;
import javax.persistence.Table;

@Getter
@NoArgsConstructor
@Table(name = "refresh_token")
@Entity
public class RefreshToken {

    @Id
    private String key;

    @Column(nullable = false)
    private String value;

    public void updateValue(String token) {
        this.value = token;
    }

    @Builder
    public RefreshToken(String key, String value) {
        this.key = key;
        this.value = value;
    }
}
Member 와 Authority 그리고 RefreshToken 은 JpaRepository 를 이용합니다.
MemberRepository.java
package com.memo.backend.domain.member;

import org.springframework.data.jpa.repository.JpaRepository;
import org.springframework.stereotype.Repository;

import java.util.Optional;

public interface MemberRepository extends JpaRepository<Member,Long> {
    Optional<Member> findByEmail(String email);
    boolean existsByEmail(String email);
}
AuthorityRepository.java
package com.memo.backend.domain.Authority;

import org.springframework.data.jpa.repository.JpaRepository;
import org.springframework.stereotype.Repository;

import java.util.Optional;

public interface AuthorityRepository extends JpaRepository<Authority,String> {
    Optional<Authority> findByAuthorityName(MemberAuth authorityName);
}
RefreshTokenRepository.java
package com.memo.backend.domain.jwt;

import org.springframework.data.jpa.repository.JpaRepository;

import java.util.Optional;

public interface RefreshTokenRepository extends JpaRepository<RefreshToken,Long> {
    Optional<RefreshToken> findByKey(String key);
}
인증을 시험하기 위한 도메인들은 모두 생성하였습니다. JWT에서 가장 중요한 Token을 생성하고 Token을 인증하고 Token으로 부터 Authentication 객체를 가져오도록 도와주는 TokenProvider 객체를 생성합니다. 조금 복잡할 수 있지만 차례대로 살펴 보겠습니다.
TokenProvider.java
package com.memo.backend.jwt;
import com.memo.backend.domain.Authority.Authority;
import com.memo.backend.domain.Authority.MemberAuth;
import com.memo.backend.domain.member.Member;
import com.memo.backend.domain.member.MemberRepository;
import com.memo.backend.dto.jwt.TokenDTO;
import com.memo.backend.dto.login.LoginReqDTO;
import com.memo.backend.exceptionhandler.AuthorityExceptionType;
import com.memo.backend.exceptionhandler.BizException;
import com.memo.backend.exceptionhandler.JwtExceptionType;
import com.memo.backend.exceptionhandler.MemberExceptionType;
import com.memo.backend.service.member.CustomUserDetailsService;
import io.jsonwebtoken.*;
import io.jsonwebtoken.Jwts;
import io.jsonwebtoken.io.*;
import io.jsonwebtoken.security.Keys;
import lombok.Getter;
import lombok.RequiredArgsConstructor;
import lombok.extern.slf4j.Slf4j;
import ognl.Token;
import org.springframework.beans.factory.InitializingBean;
import org.springframework.beans.factory.annotation.Value;
import org.springframework.security.authentication.AuthenticationManager;
import org.springframework.security.authentication.UsernamePasswordAuthenticationToken;
import org.springframework.security.core.Authentication;
import org.springframework.security.core.AuthenticationException;
import org.springframework.security.core.GrantedAuthority;
import org.springframework.security.core.authority.SimpleGrantedAuthority;
import org.springframework.security.core.userdetails.User;
import org.springframework.security.core.userdetails.UserDetails;
import org.springframework.stereotype.Component;
import org.springframework.util.StringUtils;
import java.security.Key;
import java.util.Arrays;
import java.util.Collection;
import java.util.Date;
import java.util.Set;
import java.util.stream.Collectors;
/**
* TokenProvider 설명 :
* @author jowonjun
* @version 1.0.0
* 작성일 : 2022/02/09
**/
@Slf4j
@Getter
@Component
public class TokenProvider {
private static final String AUTHORITIES_KEY = "auth";
private static final String BEARER_TYPE = "Bearer";
private final long ACCESS_TOKEN_EXPIRE_TIME; // 30분
private final long REFRESH_TOKEN_EXPIRE_TIME; // 7일
private final Key key;
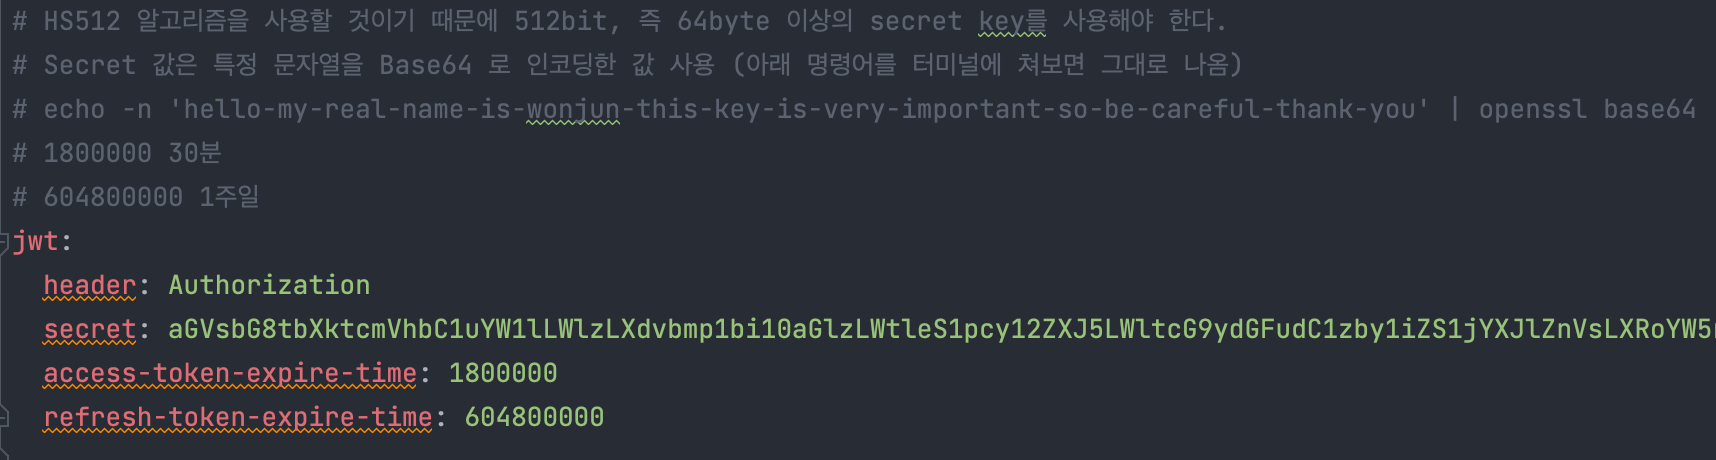
public TokenProvider(@Value("${jwt.secret}") String secretKey ,
@Value("${jwt.access-token-expire-time}") long accessTime,
@Value("${jwt.refresh-token-expire-time}") long refreshTime
) {
this.ACCESS_TOKEN_EXPIRE_TIME = accessTime;
this.REFRESH_TOKEN_EXPIRE_TIME = refreshTime;
byte[] keyBytes = Decoders.BASE64.decode(secretKey);
this.key = Keys.hmacShaKeyFor(keyBytes);
}
protected String createToken(String email, Set<Authority> auth,long tokenValid) {
// ex) sub : abc@abc.com
Claims claims = Jwts.claims().setSubject(email);
// ex) auth : ROLE_USER,ROLE_ADMIN
claims.put(AUTHORITIES_KEY,
auth.stream()
.map(Authority::getAuthorityName)
.collect(Collectors.joining(","))
);
// 현재시간
Date now = new Date();
return Jwts.builder()
.setClaims(claims) // 토큰 발행 유저 정보
.setIssuedAt(now) // 토큰 발행 시간
.setExpiration(new Date(now.getTime() + tokenValid)) // 토큰 만료시간
.signWith(key,SignatureAlgorithm.HS512) // 키와 알고리즘 설정
.compact();
}
/**
*
* @param email
* @param auth
* @return 엑세스 토큰 생성
*/
public String createAccessToken(String email,Set<Authority> auth) {
return this.createToken(email,auth,ACCESS_TOKEN_EXPIRE_TIME);
}
/**
*
* @param email
* @param auth
* @return 리프레시 토큰 생성
*/
public String createRefreshToken(String email,Set<Authority> auth) {
return this.createToken(email,auth,REFRESH_TOKEN_EXPIRE_TIME);
}
/**
*
* @param token
* @return 토큰 값을 파싱하여 클레임에 담긴 이메일 값을 가져온다.
*/
public String getMemberEmailByToken(String token) {
// 토큰의 claim 의 sub 키에 이메일 값이 들어있다.
return this.parseClaims(token).getSubject();
}
/**
*
* @param accessToken
* @param refreshToken
* @return TOEKN DTO를 생성한다.
*/
public TokenDTO createTokenDTO(String accessToken,String refreshToken) {
return TokenDTO.builder()
.accessToken(accessToken)
.refreshToken(refreshToken)
.grantType(BEARER_TYPE)
.build();
}
public Authentication getAuthentication(String accessToken) throws BizException{
// 토큰 복호화
Claims claims = parseClaims(accessToken);
if (claims.get(AUTHORITIES_KEY) == null || !StringUtils.hasText(claims.get(AUTHORITIES_KEY).toString())) {
throw new BizException(AuthorityExceptionType.NOT_FOUND_AUTHORITY); // 유저에게 아무런 권한이 없습니다.
}
log.debug("claims.getAuth = {}",claims.get(AUTHORITIES_KEY));
log.debug("claims.getEmail = {}",claims.getSubject());
// 클레임에서 권한 정보 가져오기
Collection<? extends GrantedAuthority> authorities =
Arrays.stream(claims.get(AUTHORITIES_KEY).toString().split(","))
.map(SimpleGrantedAuthority::new)
.collect(Collectors.toList());
authorities.stream().forEach(o->{
log.debug("getAuthentication -> authorities = {}",o.getAuthority());
});
// UserDetails 객체를 만들어서 Authentication 리턴
UserDetails principal = new User(claims.getSubject(), "", authorities);
return new CustomEmailPasswordAuthToken(principal, "", authorities);
}
public int validateToken(String token) {
try {
Jwts.parserBuilder().setSigningKey(key).build().parseClaimsJws(token);
return 1;
} catch (ExpiredJwtException e) {
log.info("만료된 JWT 토큰입니다.");
return 2;
} catch (Exception e) {
log.info("잘못된 토큰입니다.");
return -1;
}
}
private Claims parseClaims(String accessToken) {
try {
return Jwts.parserBuilder().setSigningKey(key).build().parseClaimsJws(accessToken).getBody();
} catch (ExpiredJwtException e) { // 만료된 토큰이 더라도 일단 파싱을 함
return e.getClaims();
}
}
}
1. JWT claim 정보에 들어갈 멤버의 권한을 나타내는 key 값입니다. ex) auth : ROLE_USER
private static final String AUTHORITIES_KEY = "auth";2. HTTP Header 중 Authorization 필드에 들어가는 prefix로서 JWT를 쓴다면 "Bearer "(띄어쓰기 주의) 를 사용하도록 하는 일종의 약속 같은 개념입니다.
private static final String BEARER_TYPE = "Bearer";3. application.yml 에서 가져오는 토큰의 유효기간과 토큰에 사인하기 위한 키값을 생성합니다.
private final long ACCESS_TOKEN_EXPIRE_TIME;            // 30분
private final long REFRESH_TOKEN_EXPIRE_TIME;  // 7일

private final Key key;

public TokenProvider(@Value("${jwt.secret}") String secretKey ,
                     @Value("${jwt.access-token-expire-time}") long accessTime,
                     @Value("${jwt.refresh-token-expire-time}") long refreshTime
                     ) {
    this.ACCESS_TOKEN_EXPIRE_TIME = accessTime;
    this.REFRESH_TOKEN_EXPIRE_TIME = refreshTime;
    byte[] keyBytes = Decoders.BASE64.decode(secretKey);
    this.key = Keys.hmacShaKeyFor(keyBytes);
}
4. 사용자의 이메일과 권한들을 받아서 토큰을 생성합니다. 클레임의 value 값으로 Set이 아니라 String으로 넣어뒀는데 구현의 편의상 String이 편해서 String으로 권한들을 joining하였습니다.
protected String createToken(String email, Set<Authority> auth,long tokenValid) {
    // ex) sub : abc@abc.com
    Claims claims = Jwts.claims().setSubject(email);

    // ex)  auth : ROLE_USER,ROLE_ADMIN
    claims.put(AUTHORITIES_KEY,
            auth.stream()
                    .map(Authority::getAuthorityName)
                    .collect(Collectors.joining(","))
    );

    // 현재시간
    Date now = new Date();

    return Jwts.builder()
            .setClaims(claims) // 토큰 발행 유저 정보
            .setIssuedAt(now) // 토큰 발행 시간
            .setExpiration(new Date(now.getTime() + tokenValid)) // 토큰 만료시간
            .signWith(key,SignatureAlgorithm.HS512) // 키와 알고리즘 설정
            .compact();
}
5. 엑세스 토큰과 리프레시 토큰을 위 createToken 함수를 재 사용하여 생성합니다.
/**
 *
 * @param email
 * @param auth
 * @return 엑세스 토큰 생성
 */
public String createAccessToken(String email,Set<Authority> auth) {
    return this.createToken(email,auth,ACCESS_TOKEN_EXPIRE_TIME);
}

/**
 *
 * @param email
 * @param auth
 * @return 리프레시 토큰 생성
 */
public String createRefreshToken(String email,Set<Authority> auth) {
    return this.createToken(email,auth,REFRESH_TOKEN_EXPIRE_TIME);
}
6. 엑세스 토큰을 파싱합니다. 만료되더라도 반환하는 이유는 재발행 때문입니다.
private Claims parseClaims(String accessToken) {
    try {
        return Jwts.parserBuilder().setSigningKey(key).build().parseClaimsJws(accessToken).getBody();
    } catch (ExpiredJwtException e) { // 만료된 토큰이 더라도 일단 파싱을 함
        return e.getClaims();
    }
}
7. 토큰을 검사하는 메서드인데 Exception을 throw하지 않고 int 를 리턴한 이유는 try catch로 지저분해지는 필터의 코드를 좀 더 가독성있게 수정하기 위함인데 더 좋은 방법이 있을 듯 합니다.
public int validateToken(String token) {
    try {
        Jwts.parserBuilder().setSigningKey(key).build().parseClaimsJws(token);
        return 1;
    } catch (ExpiredJwtException e) {
        log.info("만료된 JWT 토큰입니다.");
        return 2;
    } catch (Exception e) {
        log.info("잘못된 토큰입니다.");
        return -1;
    }
}
8. 토큰에서 Authentication 인스턴스를 가져오는 메서드입니다. CustomEmailPasswordAuthToken 은 제가 UsernamePasswordAuthenticationToken 을 커스터마이징한 클래스입니다.
public Authentication getAuthentication(String accessToken) throws BizException{

    // 토큰 복호화
    Claims claims = parseClaims(accessToken);

    if (claims.get(AUTHORITIES_KEY) == null || !StringUtils.hasText(claims.get(AUTHORITIES_KEY).toString())) {
        throw new BizException(AuthorityExceptionType.NOT_FOUND_AUTHORITY); // 유저에게 아무런 권한이 없습니다.
    }

    log.debug("claims.getAuth = {}",claims.get(AUTHORITIES_KEY));
    log.debug("claims.getEmail = {}",claims.getSubject());

    // 클레임에서 권한 정보 가져오기
    Collection<? extends GrantedAuthority> authorities =
            Arrays.stream(claims.get(AUTHORITIES_KEY).toString().split(","))
                    .map(SimpleGrantedAuthority::new)
                    .collect(Collectors.toList());

    authorities.stream().forEach(o->{
        log.debug("getAuthentication -> authorities = {}",o.getAuthority());
    });

    // UserDetails 객체를 만들어서 Authentication 리턴
    UserDetails principal = new User(claims.getSubject(), "", authorities);

    return new CustomEmailPasswordAuthToken(principal, "", authorities);
}
UsernamePasswordAuthenticationToken 을 대신하여 커스터 마이징한 토큰 입니다. UsernamePasswordAuthenticationToken의 상당부분을 그대로 가져왔습니다.
CustomEmailPasswordAuthToken.java
package com.memo.backend.jwt;

import org.springframework.security.authentication.AbstractAuthenticationToken;
import org.springframework.security.core.GrantedAuthority;

import java.util.Collection;

public class CustomEmailPasswordAuthToken extends AbstractAuthenticationToken {

    private final Object principal;

    private Object credentials;

    public CustomEmailPasswordAuthToken(Object principal, Object credentials) {
        super(null);
        this.principal = principal;
        this.credentials = credentials;
        setAuthenticated(false);
    }

    public CustomEmailPasswordAuthToken(Object principal, Object credentials,
                                               Collection<? extends GrantedAuthority> authorities) {
        super(authorities);
        this.principal = principal;
        this.credentials = credentials;
        super.setAuthenticated(true); // must use super, as we override
    }

    @Override
    public Object getCredentials() {
        return this.credentials;
    }

    @Override
    public Object getPrincipal() {
        return this.principal;
    }
}
UsernamePasswordAuthenticationToken 과 CustomEmailPasswordAuthToken 비교해봅니다.
UsernamePasswordAuthenticationToken.java
/*
 * Copyright 2004, 2005, 2006 Acegi Technology Pty Limited
 *
 * Licensed under the Apache License, Version 2.0 (the "License");
 * you may not use this file except in compliance with the License.
 * You may obtain a copy of the License at
 *
 *      https://www.apache.org/licenses/LICENSE-2.0
 *
 * Unless required by applicable law or agreed to in writing, software
 * distributed under the License is distributed on an "AS IS" BASIS,
 * WITHOUT WARRANTIES OR CONDITIONS OF ANY KIND, either express or implied.
 * See the License for the specific language governing permissions and
 * limitations under the License.
 */

package org.springframework.security.authentication;

import java.util.Collection;

import org.springframework.security.core.GrantedAuthority;
import org.springframework.security.core.SpringSecurityCoreVersion;
import org.springframework.util.Assert;

/**
 * An {@link org.springframework.security.core.Authentication} implementation that is
 * designed for simple presentation of a username and password.
 * <p>
 * The <code>principal</code> and <code>credentials</code> should be set with an
 * <code>Object</code> that provides the respective property via its
 * <code>Object.toString()</code> method. The simplest such <code>Object</code> to use is
 * <code>String</code>.
 *
 * @author Ben Alex
 */
public class UsernamePasswordAuthenticationToken extends AbstractAuthenticationToken {

   private static final long serialVersionUID = SpringSecurityCoreVersion.SERIAL_VERSION_UID;

   private final Object principal;

   private Object credentials;

   /**
    * This constructor can be safely used by any code that wishes to create a
    * <code>UsernamePasswordAuthenticationToken</code>, as the {@link #isAuthenticated()}
    * will return <code>false</code>.
    *
    */
   public UsernamePasswordAuthenticationToken(Object principal, Object credentials) {
      super(null);
      this.principal = principal;
      this.credentials = credentials;
      setAuthenticated(false);
   }

   /**
    * This constructor should only be used by <code>AuthenticationManager</code> or
    * <code>AuthenticationProvider</code> implementations that are satisfied with
    * producing a trusted (i.e. {@link #isAuthenticated()} = <code>true</code>)
    * authentication token.
    * @param principal
    * @param credentials
    * @param authorities
    */
   public UsernamePasswordAuthenticationToken(Object principal, Object credentials,
         Collection<? extends GrantedAuthority> authorities) {
      super(authorities);
      this.principal = principal;
      this.credentials = credentials;
      super.setAuthenticated(true); // must use super, as we override
   }

   @Override
   public Object getCredentials() {
      return this.credentials;
   }

   @Override
   public Object getPrincipal() {
      return this.principal;
   }

   @Override
   public void setAuthenticated(boolean isAuthenticated) throws IllegalArgumentException {
      Assert.isTrue(!isAuthenticated,
            "Cannot set this token to trusted - use constructor which takes a GrantedAuthority list instead");
      super.setAuthenticated(false);
   }

   @Override
   public void eraseCredentials() {
      super.eraseCredentials();
      this.credentials = null;
   }

}
이제 토큰과 관련된 클래스는 마무리하고 인증에 대해 알아 보겠습니다. 만약 UsernamePasswordAuthenticationToken 을 사용한다면 실제 인증하는 클래스는 DaoAuthenticationProvider 입니다. DaoAuthenticationProvider 의 내부 로직을 보면 retrieveUser 라고 있는데 여기에서 실제로 DB에서 사용자 정보를 가져옵니다.
아래의 this.getUserDetailsService() 에서는 UserDetailsService를 implement 하고 Token에 대해 support 하는 service를 찾아서 loadUserByUsername을 실행합니다.
UserDetails loadedUser = this.getUserDetailsService().loadUserByUsername(username);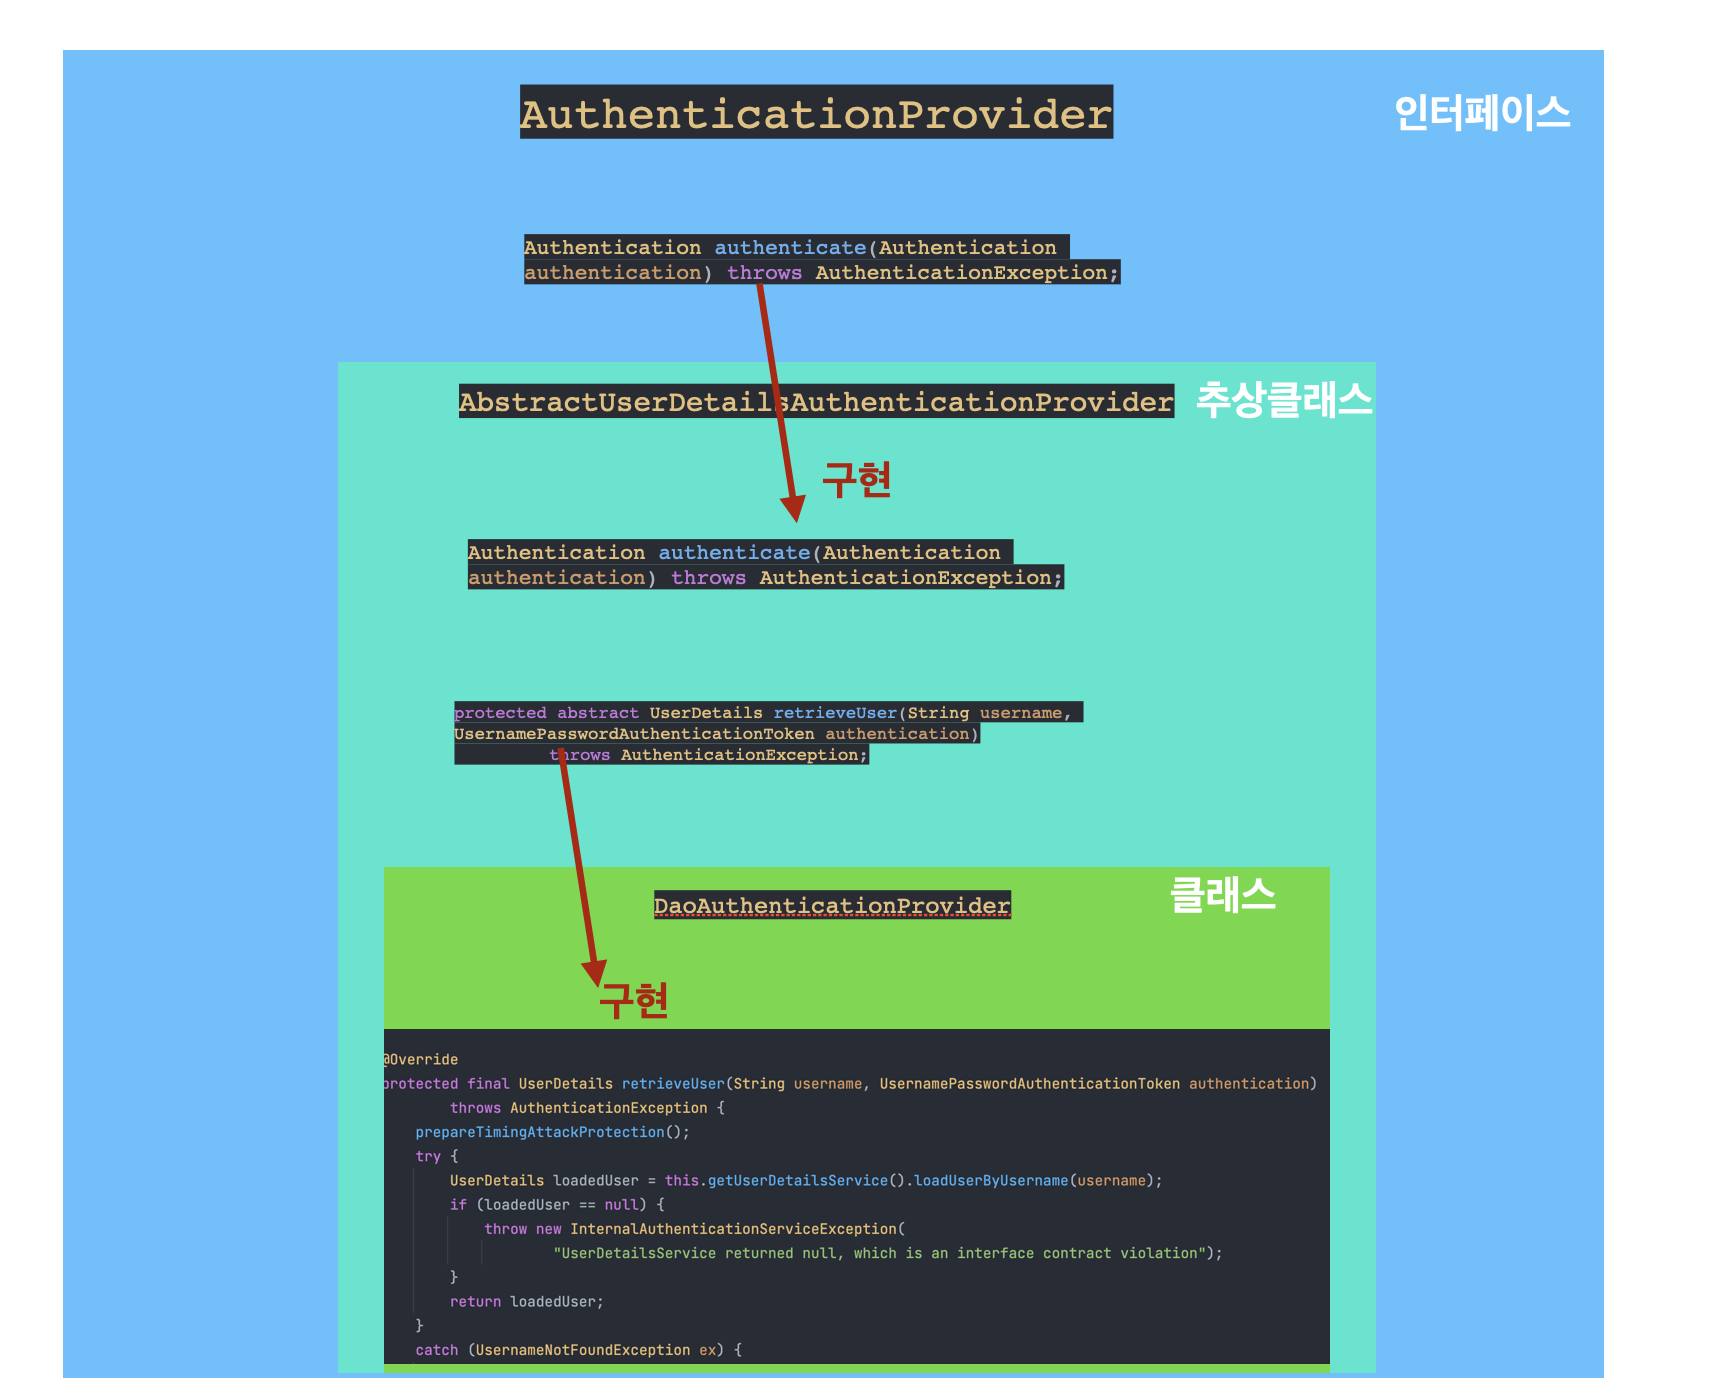
여기에 앞서서 UserDetailsService를 implement 한 서비스를 아래와 같이 생성합니다.
CustomUserDetailsService.java
package com.memo.backend.service.member;

import com.memo.backend.domain.Authority.Authority;
import com.memo.backend.domain.member.Member;
import com.memo.backend.domain.member.MemberRepository;
import com.memo.backend.exceptionhandler.BizException;
import com.memo.backend.exceptionhandler.MemberExceptionType;
import lombok.RequiredArgsConstructor;
import lombok.extern.slf4j.Slf4j;
import org.springframework.security.core.GrantedAuthority;
import org.springframework.security.core.authority.SimpleGrantedAuthority;
import org.springframework.security.core.userdetails.User;
import org.springframework.security.core.userdetails.UserDetails;
import org.springframework.security.core.userdetails.UserDetailsService;
import org.springframework.security.core.userdetails.UsernameNotFoundException;
import org.springframework.stereotype.Service;
import org.springframework.transaction.annotation.Transactional;

import java.util.Collections;
import java.util.List;
import java.util.stream.Collectors;

@Service
@RequiredArgsConstructor
@Slf4j
public class CustomUserDetailsService implements UserDetailsService {
    private final MemberRepository memberRepository;

    @Override
    @Transactional
    public UserDetails loadUserByUsername(String email) throws BizException {
        log.debug("CustomUserDetailsService -> email = {}",email);
        return memberRepository.findByEmail(email)
                .map(this::createUserDetails)
                .orElseThrow(() -> new BizException(MemberExceptionType.NOT_FOUND_USER));
    }

    @Transactional(readOnly = true)
    public Member getMember(String email) throws BizException {
        return memberRepository.findByEmail(email)
                .orElseThrow(()->new BizException(MemberExceptionType.NOT_FOUND_USER));
    }

    // DB 에 User 값이 존재한다면 UserDetails 객체로 만들어서 리턴
    private UserDetails createUserDetails(Member member) {

        // Collections<? extends GrantedAuthority>
        List<SimpleGrantedAuthority> authList = member.getAuthorities()
                .stream()
                .map(Authority::getAuthorityName)
                .map(SimpleGrantedAuthority::new)
                .collect(Collectors.toList());

        authList.forEach(o-> log.debug("authList -> {}",o.getAuthority()));

        return new User(
                member.getEmail(),
                member.getPassword(),
                authList
        );
    }
}
이제 유저정보를 가져오는 서비스를 만들었으니 Custom AuthenticationProvider를 만들어 봅니다. 상당부분 DaoAuthenticationProvider 를 참고하였으며 추상클래스에서 제공하는 authenticate 가 없기 때문에 따로 다시 구현해야 합니다.
CustomEmailPasswordAuthProvider.java
package com.memo.backend.jwt;

import com.memo.backend.exceptionhandler.BizException;
import com.memo.backend.exceptionhandler.MemberExceptionType;
import com.memo.backend.service.member.CustomUserDetailsService;
import lombok.RequiredArgsConstructor;
import lombok.extern.slf4j.Slf4j;
import org.springframework.security.authentication.*;
import org.springframework.security.core.Authentication;
import org.springframework.security.core.authority.mapping.GrantedAuthoritiesMapper;
import org.springframework.security.core.authority.mapping.NullAuthoritiesMapper;
import org.springframework.security.core.userdetails.UserDetails;
import org.springframework.security.crypto.password.PasswordEncoder;
import org.springframework.stereotype.Component;

@Slf4j
@Component
@RequiredArgsConstructor
public class CustomEmailPasswordAuthProvider implements AuthenticationProvider {

    private final PasswordEncoder passwordEncoder;
    private final CustomUserDetailsService customUserDetailsService;
    private GrantedAuthoritiesMapper authoritiesMapper = new NullAuthoritiesMapper();


    protected void additionalAuthenticationChecks(UserDetails userDetails,
                                                  CustomEmailPasswordAuthToken authentication) throws BizException {

       log.debug("additionalAuthenticationChecks authentication = {}",authentication);

        if (authentication.getCredentials() == null) {
            log.debug("additionalAuthenticationChecks is null !");
            throw new BizException(MemberExceptionType.NOT_FOUND_PASSWORD);
        }
        String presentedPassword = authentication.getCredentials().toString();
        log.debug("authentication.presentedPassword = {}",presentedPassword);

        if (!this.passwordEncoder.matches(presentedPassword, userDetails.getPassword())) {
            throw new BizException(MemberExceptionType.WRONG_PASSWORD);
        }
    }

    @Override
    public Authentication authenticate(Authentication authentication) throws BizException {
        UserDetails user = null;
        try {
            user = retrieveUser(authentication.getName());
        }catch (BizException ex) {
            throw ex;
        }

        Object principalToReturn = user;
        CustomEmailPasswordAuthToken result = new CustomEmailPasswordAuthToken(principalToReturn
                ,authentication.getCredentials()
                ,this.authoritiesMapper.mapAuthorities(user.getAuthorities()));
        additionalAuthenticationChecks(user,result);
        result.setDetails(authentication.getDetails());
        return result;
    }

    protected final UserDetails retrieveUser(String username ) throws BizException {
        try {
            UserDetails loadedUser = customUserDetailsService.loadUserByUsername(username);
            if (loadedUser == null) {
                throw new InternalAuthenticationServiceException(
                        "UserDetailsService returned null, which is an interface contract violation");
            }
            return loadedUser;
        }
        catch (BizException ex) {
            log.debug("error in retrieveUser = {}", ex.getMessage());
            throw ex;
        }
        catch (Exception ex) {
            throw new InternalAuthenticationServiceException(
                    "내부 인증 로직중 알수 없는 오류가 발생하였습니다.");
        }
    }


    @Override
    public boolean supports(Class<?> authentication) {
        return authentication.equals(CustomEmailPasswordAuthToken.class);
    }
}
지금까지 로그인 및 재발행에 필요한 모든 필요한 부품들을 구현하였고 너무 길어져서 2편에서는 실제로 동작하는 AuthService와 AuthController를 만들고 앞단에 Filter를 만들어 토큰의 검증을 필터에서 이루어지도록 하겠습니다.
https://onejunu.tistory.com/138
JWT + Spring Security 로그인 고찰 - 2
s
onejunu.tistory.com
'Spring' 카테고리의 다른 글
| [Kafka & Zookeeper 일지] Subscriber 에서 생기는 하나의 테이블에 같은 객체 쓰기(write)에 대한 동시 접근 제어 (0) | 2021.03.16 |
|---|---|
| [일지] 의존관계 주입의 필요성 (0) | 2020.10.11 |
| [일지] List 를 pageable 과 PageImpl 로 구현하기 ( List to pageImpl ) (0) | 2020.09.17 |
| [일지] mustache 에서 javascript 정적 리소스를 불러올 때 GET http://localhost:XXX net::ERR_ABORTED 404 (0) | 2020.09.15 |
| [일지] 쿼리가 너무 많이 전송되는데 줄일 수 없을까? (0) | 2020.09.07 |


댓글